null
Calibration Unmasked: The Key to Reliable Pressure Readings

Calibration Unmasked: The Key to Reliable Pressure Readings

Calibration, though often overlooked, serves as the silent hero ensuring the accuracy and reliability of the measurements that shape our world. Picture this: precision instruments in labs, factories, and even within medical devices; their ability to deliver accurate data hinges on calibration. It's the behind-the-scenes process ensuring your car's speedometer reads true, your phone's barometer predicts weather faithfully, and your health monitoring devices provide reliable insights.

Pressure sensor calibration, within this realm, holds particular significance. Pressure sensors, integral to industries spanning aviation, healthcare, manufacturing, and more, demand absolute precision. Their ability to gauge pressure accurately impacts safety, quality control, and performance. From deadweight testers ensuring precision in labs to cutting-edge electrical simulations refining sensor accuracy, pressure sensor calibration methods are the unsung heroes behind dependable pressure measurements.

Understanding these calibration methods not only demystifies their importance but also unveils the intricate processes ensuring the seamless functioning of our modern world. Join the journey through these calibration methods and witness the meticulous techniques ensuring accuracy in the very measurements we rely on daily.

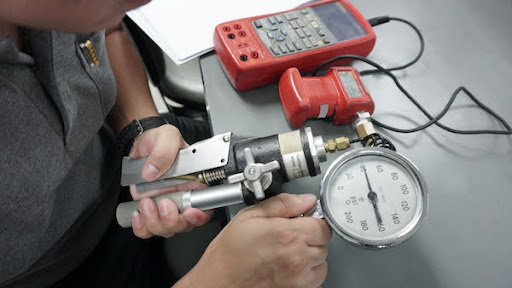
Fig 1. Pressure gauge manual calibration

How can calibrate the pressure sensor?

Calibrating a pressure sensor typically involves several steps to ensure its accuracy and reliability:

  • Understand the Sensor: Read the sensor's technical documentation thoroughly. Understand its specifications, range, and intended use.
  • Select Calibration Equipment: Obtain calibrated equipment that can apply known pressures. This could include a pressure calibrator or a deadweight tester.
  • Zero-Point Calibration: Perform a zero-point calibration to ensure the sensor reads zero when there's no pressure applied. This step accounts for any offset or drift in the sensor's baseline reading.
  • Span Calibration: Apply a known pressure value within the sensor's range and calibrate it to ensure accurate readings at this point. This is often done using the maximum and minimum pressure values the sensor is designed to measure.
  • Adjustment: Adjust the sensor output or settings based on the readings obtained during calibration. This adjustment may involve software settings or physical adjustments, depending on the sensor type.
  • Verification: After calibration, verify the sensor's readings against known pressures to confirm its accuracy. This step ensures that the sensor performs within acceptable tolerances.
  • Documentation: Keep detailed records of the calibration process, including the date, technician, equipment used, adjustments made, and verification results. Documentation is crucial for maintaining compliance and troubleshooting any future issues.
  • Regular Maintenance: Schedule regular calibration checks according to the sensor's specifications or industry standards. Over time, sensors may drift or lose accuracy, so periodic recalibration is essential.
  • Remember, calibration procedures can vary based on the type of pressure sensor, manufacturer guidelines, and the specific application. If you're unsure about the process or lack experience, it might be best to involve a professional or someone experienced in sensor calibration to ensure accuracy and reliability.

    Calibration methods

    Sure, calibration methods can vary depending on the type of instrument being calibrated and the desired level of accuracy. Here are several common calibration methods used across different industries:

  • Visual Inspection: This involves a basic visual check to ensure that the instrument is in good physical condition, with no visible damage or irregularities.
  • Functional Check: Testing the instrument's basic functions to ensure it operates as intended. For example, checking that buttons, switches, or displays are working correctly.
  • Zero and Span Adjustment: For instruments that have a measurement range, calibration involves adjusting the zero point (ensuring the instrument reads zero when there's no input) and the span (ensuring accuracy across the full measurement range).
  • Comparative Calibration: This method involves comparing the readings of the instrument being calibrated against a standard reference instrument that is more accurate or has been calibrated previously.
  • Deadweight Calibration: Primarily used for pressure instruments, deadweight testers apply known pressures to calibrate pressure sensors by using precisely calibrated weights on a piston-cylinder assembly.
  • Electrical Simulation: Particularly used for instruments that produce electrical outputs (like voltage or current), electrical simulation involves using specialized equipment to simulate these signals and calibrate the instrument accordingly.
  • Multi-point Calibration: Calibration at multiple points across the instrument's measurement range to ensure accuracy at various settings or conditions.
  • Automated Calibration Systems: Advanced systems that automate the calibration process using software-controlled equipment. These systems are efficient for calibrating multiple instruments and reduce human error.
  • Each method has its strengths and is suited for different types of instruments. The choice of calibration method depends on factors such as instrument type, accuracy requirements, industry standards, and available equipment. Manufacturers often specify recommended calibration methods for their instruments.

    Deadweight Testers

    Deadweight testers are precise instruments used for calibrating pressure sensors by applying known pressures. The core of a deadweight tester is a piston-cylinder assembly. The piston rests on a precision-machined cylinder and is loaded with calibrated weights. When the weights exert force on the piston, it generates a known pressure within the system. This pressure is then transmitted through a fluid (usually oil or water) to the sensor being calibrated. By carefully controlling the weights and the area of the piston, deadweight testers can produce highly accurate and stable pressures for calibration purposes. These testers are often used in laboratories or calibration facilities due to their high accuracy and reliability.

    Steps for using a deadweight tester in pressure sensor calibration:

  • Preparation: Ensure the deadweight tester is clean and in proper working condition. Check the weights for accuracy and any signs of damage. Verify that the piston-cylinder assembly is clean and properly lubricated.
  • Setup: Place the pressure sensor to be calibrated on the deadweight tester. Connect it securely to the system, ensuring a tight seal to prevent leaks. Ensure all connections are properly tightened and sealed.
  • Application of Weights: Add calibrated weights to the piston assembly carefully. Gradually increase the load to generate the desired pressure. The pressure generated is directly proportional to the applied weights and the effective area of the piston.
  • Stabilization and Measurement: Allow sufficient time for the system to stabilize at the desired pressure. Measure the output of the pressure sensor being calibrated. Compare this output to the known pressure generated by the deadweight tester.
  • Adjustment (if necessary): If there's a discrepancy between the sensor's output and the known pressure, make adjustments to the sensor or its calibration settings as needed.
  • Verification and Documentation: Once adjustments are made, verify the sensor's readings against the known pressure again to ensure accuracy. Document the calibration process, including the applied pressures, adjustments made, and verification results for record-keeping and future reference.
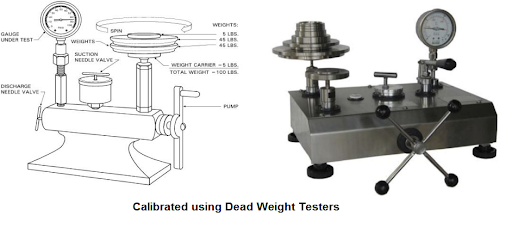
  • Fig 2. Calibrated using dead weight testers

    Visual Inspection methods

    Visual inspection is a fundamental method used to assess the physical condition of an instrument or equipment. It involves a thorough examination of the device's external components, looking for any visible signs of damage, wear, or irregularities that could affect its functionality or accuracy. During this process, technicians inspect the instrument for scratches, dents, corrosion, loose parts, or any other visible flaws that might compromise its performance. Additionally, they check for proper labeling, serial numbers, and overall cleanliness, ensuring that the instrument meets safety and quality standards.

    The inspection process often follows a checklist that outlines specific areas to examine. This could include verifying the integrity of connectors, cables, or probes, examining display screens or indicators for readability and functionality, and assessing the general structural integrity of the instrument. Visual inspection serves as an initial step before more comprehensive calibration procedures, helping identify any obvious issues that might require repair or further attention. Regular visual inspections are crucial for preventive maintenance, prolonging the lifespan of instruments and ensuring their accurate and safe operation within various industries.

    How can use this method?

    Performing a visual inspection involves a systematic examination of an instrument or equipment. Here's a step-by-step guide on how to conduct a visual inspection:

  • Preparation: Gather the necessary tools and any checklist or documentation provided by the manufacturer or your organization. Ensure you have adequate lighting and a clean, safe workspace to perform the inspection.
  • Review Documentation: Familiarize yourself with the instrument's specifications, user manual, and any guidelines for inspection provided by the manufacturer. This will help you understand what to look for during the inspection.
  • External Examination: Start by visually examining the exterior of the instrument. Look for any signs of damage, such as cracks, dents, scratches, or corrosion. Check the integrity of connectors, cables, and ports for any visible wear or loose connections.
  • Functional Check: Turn on the instrument and perform basic functions to ensure it operates as expected. Test buttons, switches, displays, or any user interfaces to confirm they are functioning properly. Check for any unusual noises or errors during operation.
  • Internal Inspection (if applicable): If feasible and if allowed by the manufacturer's guidelines, conduct an internal inspection. This might involve opening panels or covers to examine internal components for any signs of damage, dust accumulation, or loose parts. Be cautious when accessing internal components to avoid causing any damage.
  • Documentation: Document your findings, noting any issues or abnormalities discovered during the inspection. Take photographs if necessary to provide visual evidence of any concerns.
  • Follow-Up Action: Based on your findings, take appropriate action. This might involve reporting issues to the relevant department for repairs, maintenance, or further calibration.
  • Regular Inspection Schedule: Establish a regular inspection schedule based on manufacturer recommendations or industry standards. Regular visual inspections help catch potential problems early and ensure the instrument remains in good working condition.
  • Remember, while visual inspection is an essential part of maintenance, it might not uncover all potential issues. It's often just the first step in a comprehensive maintenance and calibration routine. If you're unsure or uncomfortable performing the inspection, consult a qualified technician or follow specific guidelines provided by the manufacturer.

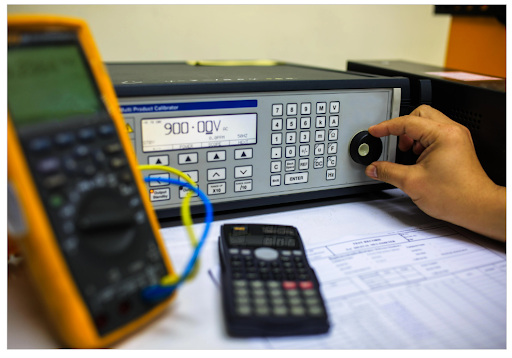
    Fig 3. Multimeter calibration

    Functional Check methods

    A functional check is a critical step in ensuring that an instrument or device operates as intended and meets its performance requirements. To conduct a functional check, start by reviewing the manufacturer's documentation or user manual to understand the standard operations and functionalities of the instrument. This provides a guideline for the specific tests you need to perform.

    Once you're familiar with the expected functionalities, proceed with the functional check. This typically involves systematically testing various components and features of the instrument. For example, if it's a temperature sensor, verify its ability to accurately measure temperatures within its specified range. If it's a digital multimeter, test its voltage, current, and resistance measurement capabilities. Use known inputs or standards to verify the instrument's readings against expected values, if available.

    During the functional check, pay attention to any irregularities or deviations from expected performance. Test different modes, settings, or operational features as outlined in the user manual. Ensure buttons, switches, displays, and interfaces work as intended. Note any errors, glitches, or inconsistencies encountered during the testing process. Functional checks are crucial to identify potential issues with the instrument's operation, allowing for necessary adjustments, repairs, or calibration to ensure accurate and reliable performance. Regular functional checks as part of a maintenance schedule help catch problems early and maintain the instrument's functionality.

    Zero and Span Adjustment

    Zero and span adjustment is a calibration process used to ensure that instruments or sensors accurately measure within their specified range. The "zero" refers to the point where the instrument should read zero when there's no input or stimulus, while the "span" represents the full measurement range of the instrument.

    During zero adjustment, the instrument is calibrated to read zero when there's no input or when the measured quantity is at its minimum. This adjustment ensures that the instrument doesn't exhibit any offset or bias when it should be registering no measurement. Span adjustment involves setting the instrument to accurately measure across its entire range, ensuring that it provides accurate readings at both minimum and maximum values within that range. Calibration technicians often use reference standards or known inputs to adjust these settings, making precise modifications to align the instrument's output with the expected values at zero and span points.

    The zero and span adjustments are critical for maintaining the accuracy and reliability of instruments. These adjustments help eliminate errors such as drift or offset that can occur over time, ensuring that the instrument provides accurate measurements throughout its operational range. Regular recalibration of zero and span points is essential to account for any changes or deviations that might affect the instrument's performance.

    Step by step guide for Zero and Span Adjustment method

    Here's a step-by-step guide for zero and span adjustment in calibration:

  • Preparation: Gather the necessary calibration equipment, which may include a reference standard, calibration software (if applicable), and any tools specified by the instrument's manufacturer. Ensure the instrument is clean, powered up, and in a stable environment suitable for calibration.
  • Zero Adjustment: a. Zero Verification: Confirm that the instrument reads zero when there is no input or when the measured quantity is at its minimum. Use the reference standard or known inputs to verify this. b. Adjustment: If the instrument doesn’t read zero accurately, make necessary adjustments based on the instrument's calibration controls. This might involve tweaking internal settings, software adjustments, or physical adjustments to align the reading to zero accurately. Follow manufacturer guidelines for adjustment procedures.
  • Span Adjustment: a. Span Verification: Apply a known input that corresponds to the maximum value within the instrument's range. Verify that the instrument's reading matches the expected value accurately. b. Adjustment: If there's a deviation in readings at the span point, perform adjustments to calibrate the instrument's response. This could involve adjusting gain, sensitivity, or other parameters to ensure accurate measurements across the full range.
  • Iterative Process: Zero and span adjustments might need to be performed iteratively. After making adjustments, verify both zero and span points again to ensure the instrument reads accurately at these values. Repeat adjustments if necessary until the readings align precisely with the known values.
  • Documentation: Record all adjustments made during the calibration process. Document the initial readings, adjustments performed, final readings, and any deviations encountered during calibration. This documentation is essential for traceability and compliance with standards.
  • Verification Testing: After completing zero and span adjustments, conduct a final verification test using various inputs or standards across the instrument's range to ensure accurate readings.
  • Finalization: Once the instrument accurately reads zero and spans the full measurement range correctly, finalize the calibration process. Affix a calibration label or mark to indicate the date of calibration and next due date for recalibration.
  • Remember, zero and span adjustments are crucial to ensuring the instrument's accuracy, and they should be performed by trained personnel following specific procedures outlined by the instrument's manufacturer or relevant standards.

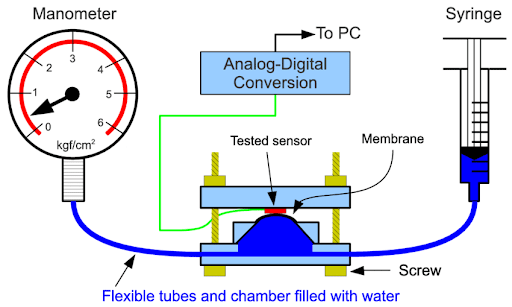
    Fig 4. Calibration system of pressure sensor

    What are important tips about Zero and Span Adjustment?

    Here are some important tips to consider when performing zero and span adjustment during calibration:

  • Understand Instrument Specifications: Familiarize yourself with the instrument's specifications, operational range, and calibration procedures outlined in the manufacturer's manual. This ensures you're aware of the instrument's capabilities and the required adjustments.
  • Use Reliable Calibration Equipment: Employ accurate reference standards or calibration equipment to verify and adjust the instrument's zero and span points. High-quality, calibrated equipment is essential for precise adjustments.
  • Perform Zero Adjustment First: Start by calibrating the zero point. Ensure the instrument accurately reads zero when there's no input or stimulus. A correct zero setting prevents offset errors in measurements.
  • Gradually Adjust Span: Once the zero is set, move on to the span adjustment. Adjust the instrument's response across the entire measurement range gradually. Small adjustments at a time allow for precise calibration without overcompensating.
  • Verify Iteratively: After each adjustment, verify the instrument's readings at zero and span points. Iterate the process if needed, making minor adjustments until the readings align precisely with the known values.
  • Document Everything: Maintain detailed records of the calibration process, including initial readings, adjustments made, final readings, deviations encountered, and calibration dates. Accurate documentation ensures traceability and assists in troubleshooting if issues arise.
  • Follow Manufacturer Guidelines: Adhere strictly to the manufacturer's recommended procedures for zero and span adjustments. Avoid deviating from specified adjustment ranges or procedures unless it's necessary and performed by qualified personnel.
  • Ensure Stability and Consistency: Perform adjustments in a stable environment with consistent conditions. Environmental factors like temperature, humidity, and electrical interference can affect calibration accuracy.
  • Regular Recalibration: Plan regular recalibration intervals based on the instrument's usage, environmental conditions, and manufacturer recommendations. Regular maintenance helps prevent drift and ensures continued accuracy.
  • Calibration Training: Properly train and certify personnel responsible for calibration. Calibration technicians should have a thorough understanding of the instruments they're calibrating and the calibration process itself.
  • Following these tips helps ensure accurate zero and span adjustments, maintaining the instrument's reliability and accuracy in measurements.

    Comparative Calibration method

    Comparative calibration is a method used to calibrate instruments by comparing their readings against a reference standard or a device with higher accuracy that has been previously calibrated. This method involves placing the instrument being calibrated and the reference standard in similar conditions and then measuring the same input or quantity with both devices. The goal is to determine any deviations or discrepancies between the readings of the instrument being calibrated and the reference standard, allowing for adjustments to be made to align the instrument's output with the known accurate readings of the reference standard.

    To conduct a comparative calibration, start by ensuring that the reference standard used is traceable to a national or international standard and has a higher accuracy than the instrument being calibrated. Place both instruments in stable environmental conditions and apply known inputs or quantities within the operational range of the instruments. Record the readings obtained from both the instrument being calibrated and the reference standard, then analyze the differences in the measurements. These differences help identify any errors or inaccuracies in the instrument being calibrated and guide adjustments to improve its accuracy.

    This method is commonly used when calibrating instruments such as thermometers, pressure gauges, multimeters, or any device where the accuracy of measurements is critical. It's essential to follow proper procedures and ensure that the comparative calibration is performed by trained personnel using calibrated and reliable reference standards to achieve accurate calibration results.

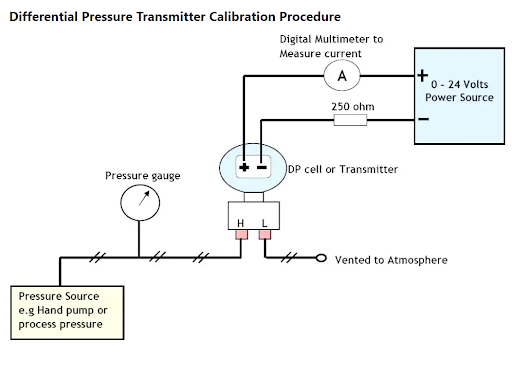
    Fig 5. Differential pressure sensor calibration

    How does Electrical Simulation method work for calibrating a pressure sensor?

    The Electrical Simulation method is employed for calibrating sensors that generate electrical output signals in response to pressure changes, such as some types of pressure sensors that produce voltage or current as their output. For instance, in the case of a pressure sensor that generates a voltage signal corresponding to the applied pressure, electrical simulation involves emulating these voltage signals to calibrate the sensor.

    Here's a general idea of how Electrical Simulation can be used for calibrating a pressure sensor:

  • Understanding Sensor Output: Pressure sensors often convert physical pressure into electrical signals, like voltage or current. The relation between the pressure applied and the resultant electrical output is defined by the sensor's characteristics.
  • Simulating Output Signals: Calibration technicians use specialized instruments or simulators capable of generating precise voltage or current signals. These simulators mimic the expected electrical output of the pressure sensor at different pressure levels within its operational range.
  • Application of Simulated Signals: Technicians feed these simulated signals into the pressure sensor instead of actual pressure inputs. The sensor should respond to these simulated signals as if they were actual pressure inputs.
  • Comparison and Adjustment: The sensor's output in response to the simulated signals is compared against expected values at different pressure levels. Any discrepancies between the sensor's output and the simulated signals are noted.
  • Adjustment and Calibration: Based on the discrepancies identified, adjustments are made to the sensor's settings or calibration factors. This could involve tweaking calibration parameters to align the sensor's output more accurately with the simulated signals.
  • Verification: After adjustments, the sensor's response to the simulated signals is rechecked to ensure that it now aligns closely with the expected electrical output corresponding to the pressure levels applied.
  • Electrical simulation offers a controlled and repeatable method for calibrating pressure sensors without the need for physical pressure sources. It's crucial to use accurate simulation equipment and follow manufacturer guidelines to ensure precise calibration of pressure sensors. This method allows for fine adjustments to the sensor's calibration to achieve accurate readings across its operational range.

    Multi-point Calibration

    Multi-point calibration involves calibrating an instrument or sensor at multiple known input points across its operational range to ensure accuracy and reliability across various measurement values. Unlike single-point calibration that adjusts at only one reference point, multi-point calibration accounts for potential nonlinearities or deviations throughout the instrument's range, enhancing its precision.

    During multi-point calibration, technicians apply different known inputs or quantities at various intervals within the instrument's measurement range. For instance, a pressure sensor might be calibrated at low, medium, and high-pressure levels relevant to its application. At each point, the sensor's output is compared against the expected values or those obtained from a reference standard. Any discrepancies are noted, and adjustments are made to minimize errors and ensure the instrument provides accurate readings across the entire range. This method ensures that the instrument's response remains consistent and accurate at different measurement points, improving its reliability for diverse applications and environments.

    Step by step guide for Multi-point Calibration

    Here's a step-by-step guide for performing a multi-point calibration:

  • Preparation: Gather the necessary calibration equipment, including a reference standard or calibrated instruments, and ensure a controlled environment suitable for calibration.
  • Understanding Instrument Range: Familiarize yourself with the instrument's operational range and specifications outlined in the manufacturer's manual. Identify the key points across this range where calibration is necessary.
  • Selection of Calibration Points: Determine the specific points within the instrument's range where calibration will be performed. These points should cover the entire range and may include low, medium, and high values, depending on the instrument's application and specifications.
  • Apply Known Inputs: Apply known inputs or quantities corresponding to the selected calibration points. For example, if calibrating a pressure sensor, apply pressures at different levels within its range using calibrated pressure sources.
  • Measure and Record Instrument Responses: Measure and record the readings or outputs of the instrument being calibrated at each calibration point. Compare these readings against the known values obtained from the reference standard or calibrated instruments.
  • Analyze Deviations and Adjustments: Analyze any discrepancies or deviations between the instrument's readings and the known values at each calibration point. Note any patterns of nonlinearities or inaccuracies across the range.
  • Make Adjustments: Make necessary adjustments to the instrument's calibration settings or factors to minimize errors and align the readings more accurately with the known values at each calibration point.
  • Recheck Readings: After adjustments, recheck the instrument's readings at each calibration point to ensure that they now align closely with the expected values.
  • Verification and Documentation: Verify that the instrument provides accurate readings at all selected calibration points. Document the calibration process thoroughly, including the applied inputs, instrument responses, adjustments made, and final readings.
  • Finalize Calibration: Once the instrument readings align accurately with the known values at all calibration points, complete the calibration process. Affix a calibration label or mark indicating the date of calibration and next due date for recalibration.
  • Performing multi-point calibration ensures the instrument maintains accuracy and reliability across its entire operational range, suitable for various measurement conditions and values.

    Important tips of Multi-point Calibration method

    Here are some important tips to consider when conducting multi-point calibration:

  • Thorough Planning: Before starting, carefully plan the calibration points across the instrument's range. Choose points that are representative of typical operating conditions and cover the entire span to ensure comprehensive calibration.
  • Accurate Reference Standards: Use highly accurate reference standards or calibrated instruments for comparing the instrument's readings at each calibration point. Reliable reference standards are crucial for precise calibration.
  • Stable Environmental Conditions: Maintain stable environmental conditions throughout the calibration process. Fluctuations in temperature, humidity, or other environmental factors can impact the accuracy of measurements.
  • Consistent Calibration Techniques: Use consistent techniques and procedures at each calibration point. This ensures uniformity and helps identify systematic errors or inconsistencies.
  • Attention to Nonlinearity: Pay attention to potential nonlinearities or deviations in the instrument's response across the range. Addressing nonlinear behavior might require specific adjustments or correction factors at different points.
  • Iterative Approach: Perform multiple iterations of measurement and adjustment at each calibration point if needed. Iterative adjustments help refine the instrument's accuracy and minimize errors.
  • Record Keeping: Maintain detailed records of the calibration process, including applied inputs, instrument responses, adjustments made, and any deviations encountered. Accurate documentation is crucial for traceability and troubleshooting.
  • Adjustment Precision: When making adjustments, apply changes gradually and precisely. Small adjustments at each calibration point can help fine-tune the instrument's response without overcompensating.
  • Verification and Validation: Verify the accuracy of the instrument's readings after adjustments at each calibration point. Ensure that the readings align closely with the known values at these points.
  • Regular Recalibration: Schedule regular recalibration intervals based on instrument usage, environmental conditions, and manufacturer recommendations. Regular calibration helps maintain accuracy over time.
  • By following these tips, technicians can conduct multi-point calibration effectively, ensuring that the instrument provides accurate and reliable measurements across its operational range for various applications.

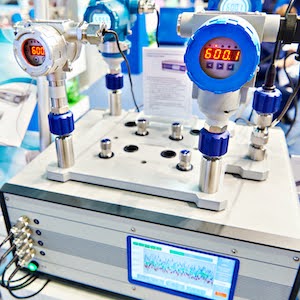
    Fig 6. Pressure gauge digital calibration

    Compare Multi-point Calibration and Zero and Span Adjustment method

    Here's a comparison table outlining the differences between Multi-point Calibration and Zero and Span Adjustment methods:

    Table 1. Comparing Multi-point Calibration and Zero and Span Adjustment method

    Aspect Multi-point Calibration Zero and Span Adjustment
    Purpose Adjusts instrument across multiple points in its range Sets instrument's zero and full-scale measurement points
    Calibration Points Multiple points across the instrument's operational range Typically focuses on two points: zero and span
    Accuracy Coverage Ensures accuracy at various intervals within the range Establishes accuracy at extremes and across the range
    Method Complexity More complex, requires calibration at multiple intervals Relatively simpler, focusing on two specific points
    Nonlinearity Consideration Addresses nonlinearity, capturing deviations in the range May not capture nonlinearities between two calibration points
    Precision Adjustment Requires adjustments at multiple points Adjustments made specifically at zero and span points
    Comprehensive Coverage Ensures accuracy at various operational conditions May not capture inaccuracies between zero and span
    Application Widely used for instruments requiring precise readings Commonly used for basic calibration in linear instruments

    Both methods aim to enhance an instrument's accuracy, but they differ in their approach to calibration. Multi-point calibration ensures accuracy at various intervals within the range, addressing potential nonlinearities. On the other hand, zero and span adjustment focuses on two specific points to set the instrument's baseline and full-scale measurements, which might not capture potential inaccuracies between these points. The choice between these methods depends on the instrument type, accuracy requirements, and the extent of calibration needed.

    How is the Automated Calibration System?

    Automated Calibration Systems are sophisticated setups designed to streamline and automate the calibration process for various instruments and devices. These systems integrate advanced software, precision equipment, and often robotic or computer-controlled mechanisms to perform calibration tasks efficiently and with high accuracy.

    One of the primary advantages of Automated Calibration Systems is their ability to reduce human error significantly. By automating calibration procedures, these systems minimize manual intervention, ensuring consistency and precision in the calibration process. They can handle large volumes of instruments and perform repetitive tasks with exceptional accuracy, saving time and resources for calibration facilities.

    These systems often feature calibration software that manages calibration schedules, records data, and generates reports, enhancing traceability and compliance with standards. Automated Calibration Systems are commonly utilized in industries with stringent calibration requirements, such as aerospace, pharmaceuticals, or manufacturing, where precision and traceability are critical. Despite the initial investment and setup costs, these systems offer long-term benefits by improving efficiency, reducing downtime, and ensuring compliance with calibration standards.

    Automated Calibration Systems working principle

    Automated Calibration Systems operate on a combination of advanced software, precision instruments, and often robotic or computer-controlled mechanisms to carry out calibration tasks. The working principle involves several key components and steps:

  • Software Management: These systems are governed by calibration management software that oversees the entire calibration process. The software schedules calibration activities, manages instrument records, stores historical calibration data, and generates reports. Technicians input calibration procedures into the software, which guides the automated system through the required steps.
  • Instrument Identification: When an instrument or device requires calibration, the system identifies it through barcodes, RFID tags, or other unique identifiers. This ensures the system retrieves the correct calibration procedure and historical data associated with that specific instrument from its database.
  • Robotic/Controlled Mechanisms: Automated Calibration Systems often employ robotic arms or computer-controlled mechanisms equipped with sensors and precision tools. These mechanisms carry out calibration tasks such as adjusting settings, applying stimuli, or making measurements on the instruments.
  • Calibration Execution: Guided by the software, the automated system executes the calibration procedure. It follows predefined steps, such as applying known inputs or stimuli, collecting data from the instrument, and comparing this data against predefined standards or reference values.
  • Data Analysis and Adjustment: The system analyzes the collected data to determine any deviations or errors in the instrument's readings compared to expected values. If discrepancies are identified, the system might automatically make adjustments based on predefined algorithms or instructions to align the instrument's readings more accurately.
  • Verification and Reporting: After calibration, the system verifies the instrument's accuracy and generates reports detailing the calibration process, adjustments made, and the instrument's post-calibration performance. This documentation is crucial for traceability, compliance, and future reference.
  • Automated Calibration Systems aim to reduce human intervention, minimize errors, and streamline the calibration process by integrating software, precision tools, and automated procedures. They ensure consistency, efficiency, and accuracy in calibration, particularly in industries requiring high precision and compliance with stringent standards.

    Are Automated Calibration Systems reliable?

    Automated Calibration Systems can be highly reliable when properly designed, implemented, and maintained. However, their reliability depends on various factors:

  • Accuracy of Equipment: The precision and accuracy of the calibration instruments and tools integrated into the automated system play a significant role in its reliability. High-quality and properly maintained calibration equipment are essential for accurate calibration.
  • Software and Algorithms: The calibration software used to manage the automated system needs to be robust and regularly updated. The algorithms used for calibration adjustments should be well-designed and validated to ensure accurate adjustments without introducing errors.
  • System Calibration and Validation: Automated Calibration Systems require periodic calibration and validation to ensure their accuracy and reliability. Regular checks and calibrations of the system components, such as sensors, robotic arms, or measuring devices, are crucial.
  • Operator Training and Oversight: Proper training of personnel who manage and oversee the system is essential. Operators should understand the system's capabilities, limitations, and how to interpret the results it generates.
  • Maintenance and Upkeep: Regular maintenance and timely repairs are necessary to ensure the system's components function optimally. Preventive maintenance routines help prevent breakdowns or inaccuracies.
  • Compliance with Standards: Automated Calibration Systems should comply with industry standards and regulations. Adhering to these standards ensures that the system meets quality requirements and performs reliably within specified tolerances.
  • When these factors are adequately addressed, Automated Calibration Systems can offer high reliability, consistency, and accuracy in the calibration process. They streamline workflows, reduce human error, and enhance traceability, making them valuable assets in industries where precise calibration and adherence to standards are critical. However, regular monitoring, maintenance, and validation are essential to maintain their reliability over time.

    Fig 7. High accuracy pressure sensor calibrator

    Important tips should observe about Automated Calibration Systems

    Here are some crucial tips to ensure the effectiveness and reliability of Automated Calibration Systems:

  • Thorough System Testing: Before integrating the system into regular operations, conduct extensive testing and validation. Ensure the system performs accurately and reliably across various calibration scenarios.
  • Equipment Quality and Calibration: Use high-quality calibration equipment that is regularly calibrated and maintained. The accuracy of the tools integrated into the automated system significantly impacts its reliability.
  • Robust Software Management: Utilize reliable and up-to-date calibration management software. Regularly update the software to incorporate improvements, bug fixes, and compliance with evolving standards.
  • Operator Training: Provide comprehensive training to operators who manage the system. Ensure they understand the system's functionalities, calibration procedures, troubleshooting protocols, and the interpretation of calibration results.
  • Regular Maintenance and Calibration: Establish a scheduled maintenance routine for the system's components. Conduct regular calibrations to verify the accuracy of the system and ensure it aligns with standards.
  • Validation Procedures: Implement validation procedures to ensure the system consistently meets accuracy and precision requirements. Perform validation checks periodically to verify the system's performance.
  • Documentation and Traceability: Maintain detailed records of calibration procedures, adjustments made, instrument performance, and validation results. Traceability of calibration activities is crucial for compliance and quality assurance.
  • Compliance with Standards: Ensure the Automated Calibration System complies with relevant industry standards and regulations. Regularly review and update procedures to align with changing standards.
  • Backup and Recovery Plans: Implement robust backup systems for data and software. Establish recovery protocols to mitigate risks in case of system failures or data loss.
  • Continuous Improvement: Foster a culture of continuous improvement. Encourage feedback from operators and technicians to identify areas for enhancement in system performance and procedures.
  • By adhering to these tips, organizations can maximize the effectiveness and reliability of Automated Calibration Systems, ensuring accurate and consistent calibration of instruments and devices in various industries.

    What are the software used in Automated Calibration Systems?

    Automated Calibration Systems utilize various types of software to manage and control the calibration process. These software applications are designed to streamline workflows, automate tasks, record data, and ensure accuracy in calibration. Here are some types of software commonly used in Automated Calibration Systems:

  • Calibration Management Software (CMS): CMS is the backbone of an Automated Calibration System. It schedules calibration tasks, manages instrument records, maintains calibration histories, and tracks calibration intervals. It often includes features for generating calibration certificates and reports, managing calibration procedures, and maintaining compliance with standards and regulations.
  • Data Acquisition Software: This software collects data from instruments or sensors during the calibration process. It interfaces with measurement devices to capture readings, measurements, and other relevant data. It might include features for real-time data monitoring and analysis.
  • Instrument Control Software: Used to control the instruments or devices involved in the calibration process. This software communicates with the instruments, sending commands for adjustments, stimulus application, or data collection.
  • Workflow Automation Software: Automates and sequences calibration procedures, guiding the system through predefined steps. It ensures consistency and accuracy in executing calibration tasks according to established procedures.
  • Report Generation Software: Generates calibration reports and certificates based on the collected data and calibration results. These reports provide detailed documentation of calibration activities, adjustments made, and instrument performance.
  • ERP or CMMS Integration Software: Enterprise Resource Planning (ERP) or Computerized Maintenance Management System (CMMS) integration software helps connect the calibration system with broader maintenance management systems, facilitating seamless data exchange and workflow integration.
  • Compliance and Audit Software: Tracks compliance with industry standards, regulations, and quality management systems. It helps ensure that the calibration processes adhere to established standards and guidelines.
  • Data Analysis and Statistical Software: Some systems might use specialized software for in-depth data analysis and statistical processing. This software helps identify trends, patterns, and potential areas for improvement in calibration processes.
  • These software applications are often integrated to create a comprehensive Automated Calibration System that efficiently manages calibration tasks, maintains accurate records, and ensures compliance with quality standards. The choice of software depends on the specific requirements of the calibration process and the industry standards to be followed.

    What are the tools used in Automated Calibration Systems?

    Automated Calibration Systems incorporate various tools and equipment to automate and perform precise calibration tasks efficiently. These tools are integrated into the system to ensure accurate measurements, adjustments, and data collection. Here are some common tools used in Automated Calibration Systems:

  • Reference Standards: High-precision calibration standards serve as benchmarks for comparing and calibrating instruments. These standards are traceable to national or international standards and provide known and accurate values for comparison.
  • Calibration Instruments: These include a wide array of devices used to measure, simulate, or apply stimuli to the instruments being calibrated. Examples include pressure calibrators, temperature baths, voltage and current sources, mass standards, and more.
  • Automated Measurement Devices: Robotic arms, automated probes, or computer-controlled mechanisms are used for hands-free handling of instruments and making precise adjustments or measurements.
  • Sensors and Detectors: Sensors are integrated into the Automated Calibration Systems to monitor and collect data during the calibration process. These sensors can measure various parameters like temperature, pressure, humidity, or electrical signals.
  • Data Acquisition Systems: Equipment for collecting and recording data from instruments during calibration. This includes data loggers, data acquisition units, and interfaces to capture readings and measurements.
  • Calibration Software: While not a physical tool, calibration software is a critical component. It manages calibration procedures, controls instruments, records data, performs analysis, and generates reports.
  • Labeling and Tracking Systems: Tools for labeling and tracking instruments throughout the calibration process. This might include barcode scanners, RFID readers, or other tracking devices to identify and manage instruments accurately.
  • Environmental Chambers or Controlled Conditions: Some systems incorporate environmental chambers or controlled environments to maintain stable conditions during calibration, especially for temperature-sensitive instruments.
  • Safety Equipment: Safety tools and protocols ensure safe operation, especially when dealing with high-pressure systems, electrical equipment, or hazardous substances.
  • Maintenance and Calibration Tools: Tools for routine maintenance, such as torque wrenches, screwdrivers, or cleaning kits, ensure that the system's components remain in optimal condition for accurate calibration.
  • Automated Calibration Systems integrate these tools and equipment to automate and streamline the calibration process, ensuring accuracy, efficiency, and compliance with quality standards. The selection of tools depends on the types of instruments being calibrated and the specific requirements of the calibration process.

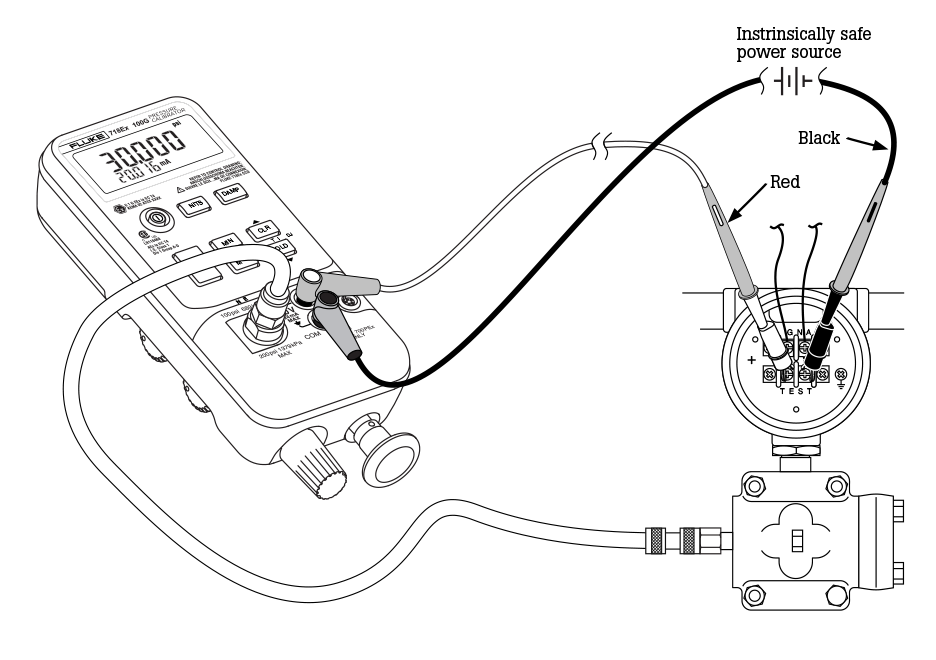
    Fig 8. To calibrate P/I sensor

    Which calibration instruments are used in Automated Calibration Systems?

    Automated Calibration Systems utilize various calibration instruments to perform precise and automated calibration across different types of measurement parameters. These instruments are integral components of the system, allowing for accurate adjustment, verification, and validation of other instruments or devices being calibrated. Here are some common calibration instruments used in Automated Calibration Systems:

  • Pressure Calibrators: These instruments generate precise pressure levels used to calibrate pressure sensors, transmitters, gauges, or other pressure measuring devices. They can simulate both positive and negative pressure values accurately.
  • Temperature Baths: Used to create stable and accurate temperature environments for calibrating temperature sensors, thermocouples, RTDs (Resistance Temperature Detectors), or thermometers across a range of temperatures.
  • Multifunction Calibrators: Versatile instruments that can simulate and calibrate multiple parameters such as voltage, current, resistance, frequency, and more. They are useful for calibrating multimeters, process meters, or controllers.
  • Electrical Calibrators: These calibrate electrical signals, including voltage and current sources, used to verify the accuracy of instruments such as oscilloscopes, power meters, or electrical meters.
  • Mass Standards: Precision weights and mass comparators used for calibrating balances, scales, or weight measurement instruments to ensure accurate mass measurements.
  • Flow Calibrators: Instruments that simulate and measure flow rates, commonly used in calibrating flow meters, flow sensors, or other devices that measure fluid flow.
  • Signal Generators and Analyzers: Instruments that generate and analyze various electronic signals, used for calibrating frequency, waveform, or signal-related instruments like oscilloscopes, spectrum analyzers, or signal generators.
  • Dimensional Calibration Tools: Devices like micrometers, calipers, or gauge blocks used for calibrating dimensional measurement instruments such as height gauges, calipers, or coordinate measuring machines (CMMs).
  • Humidity and Environmental Calibration Instruments: Equipment used for calibrating instruments that measure humidity, environmental conditions, or air quality, ensuring accuracy in environmental monitoring instruments.
  • Optical Calibration Tools: Instruments used to calibrate optical devices like spectrophotometers, photometers, or cameras, ensuring accurate measurements related to light, color, or imaging.
  • These calibration instruments, among others, are integrated into Automated Calibration Systems to automate calibration processes, maintain precision, and ensure accurate measurements across various parameters and instruments. The selection of instruments depends on the types of instruments being calibrated and the specific parameters requiring calibration within the automated system.

    Safety Equipment that used in Automated Calibration Systems

    Safety is paramount in any calibration process, especially in Automated Calibration Systems where various instruments and equipment are involved. Here are some essential safety equipment commonly used in these systems:

  • Personal Protective Equipment (PPE): This includes items such as safety goggles, gloves, lab coats, and appropriate footwear to protect technicians from potential hazards during calibration procedures. PPE is essential when handling instruments that might involve electrical connections, pressure sources, or hazardous materials.
  • Safety Signs and Labels: Clear signage indicating potential hazards, emergency procedures, and safety precautions within the calibration area is crucial. Labels on equipment, especially those indicating high voltage, high pressure, or other risks, help remind personnel of potential dangers.
  • First Aid Kits and Emergency Equipment: Accessible first aid kits, eyewash stations, and fire extinguishers should be present in the calibration area. Automated Calibration Systems often have emergency shutdown procedures in case of accidents or malfunctions.
  • Ventilation and Fume Extraction Systems: Depending on the instruments involved, ventilation systems or fume extractors might be necessary to control exposure to hazardous fumes or gases produced during certain calibration processes.
  • Lockout/Tagout Systems: In situations where calibration involves potentially dangerous machinery or electrical systems, lockout/tagout systems prevent accidental activation or energization of equipment under calibration, ensuring technician safety.
  • Insulated Tools and Equipment: Insulated tools, gloves, and mats are crucial when dealing with electrical equipment. They help protect technicians from electrical shocks during calibration procedures.
  • Equipment Enclosures and Guards: Enclosures and guards around high-voltage or high-pressure equipment prevent accidental contact, reducing the risk of injury during calibration tasks.
  • Training and Safety Protocols: Adequate training on safety protocols specific to the Automated Calibration System is essential. Technicians should be well-versed in safety procedures, emergency shutdown protocols, and the correct use of safety equipment.
  • Regular Maintenance of Safety Equipment: Ensuring that safety equipment is well-maintained and regularly inspected is crucial. This includes checking the expiration dates of safety gear, testing emergency equipment, and repairing or replacing any faulty items.
  • Risk Assessments and Safety Audits: Conducting regular risk assessments and safety audits helps identify potential hazards in the calibration area and ensures that safety measures remain effective and up-to-date.
  • Implementing and maintaining proper safety measures and equipment in Automated Calibration Systems is essential to safeguard technicians, prevent accidents, and ensure a secure working environment during calibration procedures.

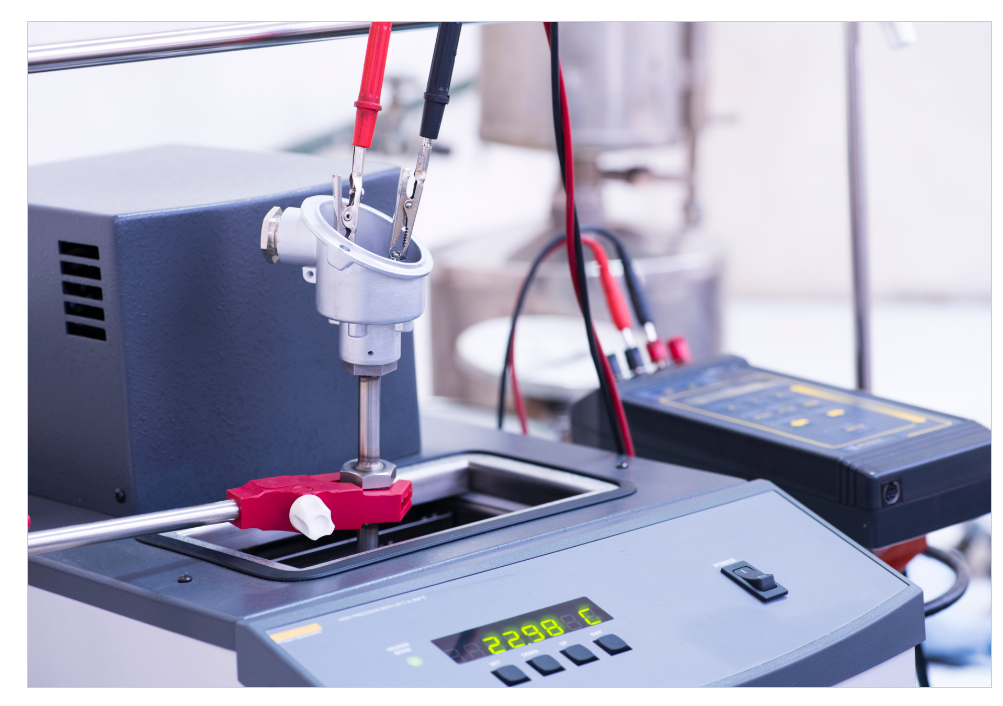
    Fig 9. Thermocouple calibration

    How can understand the calibration results are valid?

    Validating calibration results involves several steps to ensure accuracy, reliability, and compliance with established standards. Here are some key aspects to consider to understand if calibration results are valid:

  • Traceability: Ensure the calibration process follows a traceable chain to a recognized standard. Valid calibration results are traceable back to national or international standards, providing a clear lineage of measurement assurance.
  • Calibration Procedures: Verify that the calibration procedures followed are documented, standardized, and adhere to recognized protocols or manufacturer specifications. Any deviations or adjustments made during the process should be well-documented.
  • Reference Standards: Check the accuracy of reference standards used in the calibration process. Ensure these standards are regularly calibrated and traceable to higher-level standards.
  • Measurement Uncertainty: Understand the measurement uncertainty associated with the calibration results. This uncertainty quantifies the range within which the true value likely lies. Valid results should include an assessment of measurement uncertainty.
  • Repeatability and Reproducibility: Evaluate the repeatability and reproducibility of calibration measurements. Repeatability ensures consistent results when repeated under the same conditions, while reproducibility confirms consistent results among different operators or instruments.
  • Record Keeping: Thoroughly review the documentation associated with the calibration process. This includes calibration certificates, records of adjustments made, instrument performance before and after calibration, environmental conditions, and any issues encountered during calibration.
  • Compliance with Standards: Ensure that the calibration process complies with relevant industry standards, regulations, or quality management system requirements. Valid calibration results meet the specified criteria outlined by these standards.
  • Verification and Validation Checks: Perform verification checks by using known reference materials or standards to validate the accuracy of the calibration results. Validation involves assessing the instrument's performance under specific conditions to confirm its suitability for intended use.
  • Independent Review: Consider having an independent reviewer or qualified personnel examine the calibration results and associated documentation. This review helps verify the validity and accuracy of the calibration process.
  • By meticulously assessing these factors and ensuring compliance with standards and best practices, you can determine the validity of calibration results. Valid calibration results are essential to maintain the accuracy and reliability of measurement instruments and support decision-making processes based on these measurements.

    How can verify the calibration result?

    Verifying calibration results involves confirming the accuracy and reliability of the calibration process by using known references or methods. Here's a guide to verifying calibration results:

  • Reference Standards: Utilize known reference standards or equipment with established accuracy and traceability to higher standards. Compare the measurements obtained from the instrument after calibration with the known values from the reference standards.
  • Check Against Published Data: Compare the calibrated instrument's readings with published or documented data for the same or similar instruments under similar conditions. This comparison helps ensure the instrument's performance aligns with expected values.
  • Repeatability Test: Conduct multiple measurements using the calibrated instrument under the same conditions to check for repeatability. Valid calibration results should yield consistent measurements when repeated.
  • Cross-Check with Another Instrument: Use a second, independently calibrated instrument of the same type to measure the same parameter. Compare the readings from both instruments to verify consistency and accuracy.
  • Use Control Samples or Test Materials: If applicable, use control samples or test materials with known properties to validate the instrument's accuracy. Compare the instrument's measurements with the expected values of the control samples.
  • Measurement Uncertainty Assessment: Assess the measurement uncertainty associated with the calibrated instrument. Compare the uncertainty values obtained from the calibration process with acceptable limits or industry standards.
  • Validation under Different Conditions: Validate the instrument's performance under different environmental conditions or operating ranges relevant to its intended use. Ensure the instrument maintains accuracy and reliability across these variations.
  • Historical Data Analysis: Analyze historical calibration data and trends for the instrument. Check if the current calibration results align with past performance, ensuring consistency over time.
  • Independent Verification: Engage an independent party or qualified personnel not directly involved in the calibration process to review and verify the calibration results. This independent verification adds another layer of confirmation.
  • By implementing these verification methods, you can ensure the reliability, accuracy, and consistency of calibration results. It's crucial to perform these verification checks periodically to maintain confidence in the instrument's performance and adherence to standards.

    Conclusion

    Calibration is a critical process to ensure the accuracy and reliability of measurement instruments. Whether using Automated Calibration Systems or traditional methods, obtaining valid and verified calibration results is essential for various industries, ensuring precise measurements that underpin quality, safety, and compliance.

    Validating calibration results involves a meticulous approach, considering factors such as traceability, adherence to standards, reference standards' accuracy, and measurement uncertainty. Verifying calibration results includes cross-checking with known references, repeatability tests, comparison with published data, and assessing instrument performance under varied conditions.

    Automated Calibration Systems offer efficiency and consistency in the calibration process, integrating advanced software, precision tools, and safety measures. However, their reliability hinges on factors like accurate equipment, robust software management, thorough training, and continuous maintenance.

    Ultimately, ensuring valid calibration results involves a comprehensive approach that includes adherence to standardized procedures, regular maintenance, stringent record-keeping, and a commitment to continuous improvement. Valid and verified calibration results are the cornerstone of accurate measurements, contributing significantly to quality assurance, regulatory compliance, and reliable operations across industries.

    To recap

    1.What is pressure sensor calibration?

    Pressure sensor calibration is the process of adjusting and verifying the accuracy of pressure measurements obtained from a pressure sensor by comparing its readings with known reference standards or values. 

    2.Why is pressure sensor calibration important?

    Calibration ensures that pressure sensors provide accurate and reliable measurements, critical for various applications in industries like manufacturing, aerospace, automotive, and healthcare. 

    3.What are the common pressure sensor calibration methods?

    Common pressure sensor calibration methods include deadweight testers, hydraulic or pneumatic calibrators, electrical simulation, multi-point calibration, and zero and span adjustment. 

    4.How does a deadweight tester work in pressure sensor calibration? 

    A deadweight tester uses calibrated weights to apply known pressures to a sensor. The weights create a force on a piston, generating a precise pressure that can be compared against the sensor's readings. 

    5.What is the purpose of zero and span adjustment in pressure sensor calibration?

    Zero and span adjustment sets the baseline output (zero) and full-scale range (span) of the pressure sensor to ensure accurate readings within its operational limits.

    6.What is multi-point calibration for pressure sensors? 

    Multi-point calibration involves calibrating pressure sensors at various known pressure levels across their operational range to ensure accuracy and reliability at different measurement points. 

    7.How does electrical simulation work in pressure sensor calibration?

    Electrical simulation generates electrical signals that simulate pressure values, allowing calibration of pressure sensors that respond to electrical signals rather than physical pressure.

    8.What is the significance of traceability in pressure sensor calibration? 

    Traceability ensures that calibration results can be traced back to recognized standards, providing assurance of accuracy and reliability in pressure sensor measurements. 

    9.Can pressure sensor calibration be performed in-house?

    Yes, many organizations conduct in-house pressure sensor calibration using calibrated equipment, reference standards, and proper procedures to maintain accuracy and reduce downtime. 

    10.How often should pressure sensors be calibrated?

    Calibration frequency depends on factors like usage, environmental conditions, and industry standards. Typically, pressure sensors are calibrated annually, but critical applications may require more frequent calibration.

    References

    https://www.researchgate.net/figure/Calibration-system-for-pressure-sensors-Based-on-the-leaf-Wiltmeter-developed-by-Calbo_fig13_236691968

    https://us.flukecal.com/blog/how-calibrate-pressure-transmitter-on-bench

    https://instrumentationtools.com/differential-pressure-transmitter-calibration-procedure/

    https://www.fluke.com/en-us/learn/blog/calibration/pressure-transducer-calibration

    https://us.flukecal.com/literature/articles-and-education/pressure-calibration/application-notes/calibrating-pressure-transm

    https://www.transmittershop.com/blog/important-calibration-tips-for-pressure-sensors/

    https://tameson.com/pages/pressure-gauge-calibration

    https://www.transmittershop.com/Assets/images/FCUIEagle/1/Blog_200X112/Blog_15.jpg

    https://control.com/technical-articles/what-is-instrument-calibration-and-why-is-it-needed/

    27th Jan 2024

    Recent Posts